How to Change Print Size on iPhone (Exact Inches, Paper Size & Custom Sizes)

12 min read
Contents
Photo Printer

Set the size, check the ruler, print once.

Quick Answer

To change print size on iPhone, set the photo’s exact size before you print, check the preview, then print at 100% scale. The iPhone’s built-in Print screen can choose a paper size but not a photo size, so use an app like Photo Printer: pick the paper size, add your photo, type the width and height you want in inches, cm or mm, and print.

✓ Exact Inches, cm & mm
✓ Real-Size Preview
✓ Works with AirPrint
✓ Free to Start

Stop Guessing Print Size: Why iPhone Prints Come Out Wrong

You tap Print, the preview looks fine, and the photo comes out too big, too small or missing its edges. Nothing is wrong with your printer. The iPhone print screen lets you pick a printer, the number of copies and, sometimes, a paper size. It has no setting for how large the photo itself should be. It scales the image to fit the page and stops there.

This guide fixes that. You’ll find:

  • Four ways to change print size on iPhone, from exact-size printing to built-in workarounds
  • What the iPhone print screen can and can’t do, and where its settings are
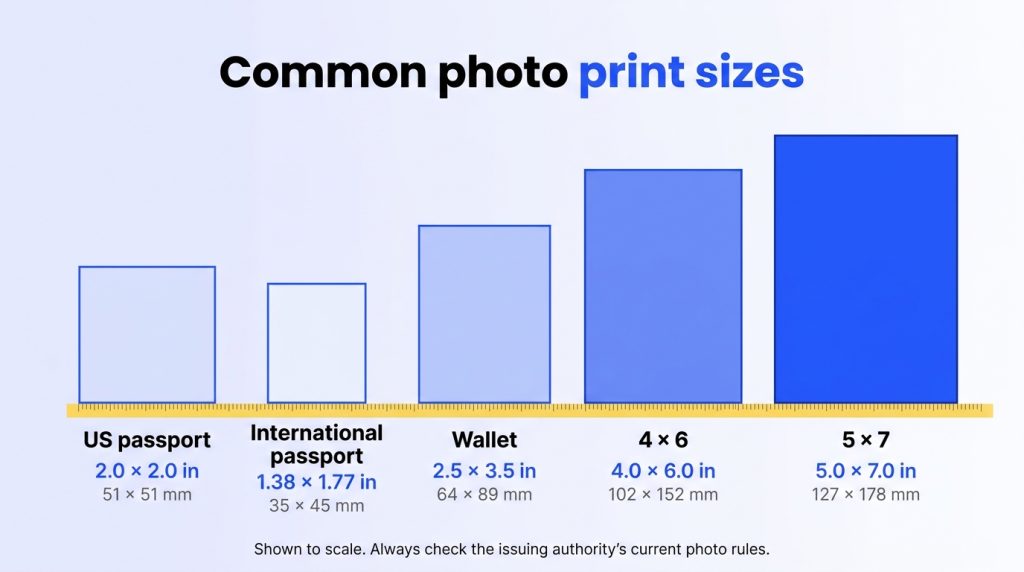
  • A size chart for passport, wallet, 4×6 and 5×7 prints in inches and millimeters
  • A checklist and troubleshooting for prints that still come out wrong

We built Photo Printer to solve exactly this, so it’s the main method. We also cover the built-in options, because sometimes they’re enough.

Print size vs paper size: what’s the difference?

Paper size is the physical sheet: Letter (8.5 × 11 in), A4 (210 × 297 mm), 4×6 photo paper. Print size is how large the photo appears on that sheet.

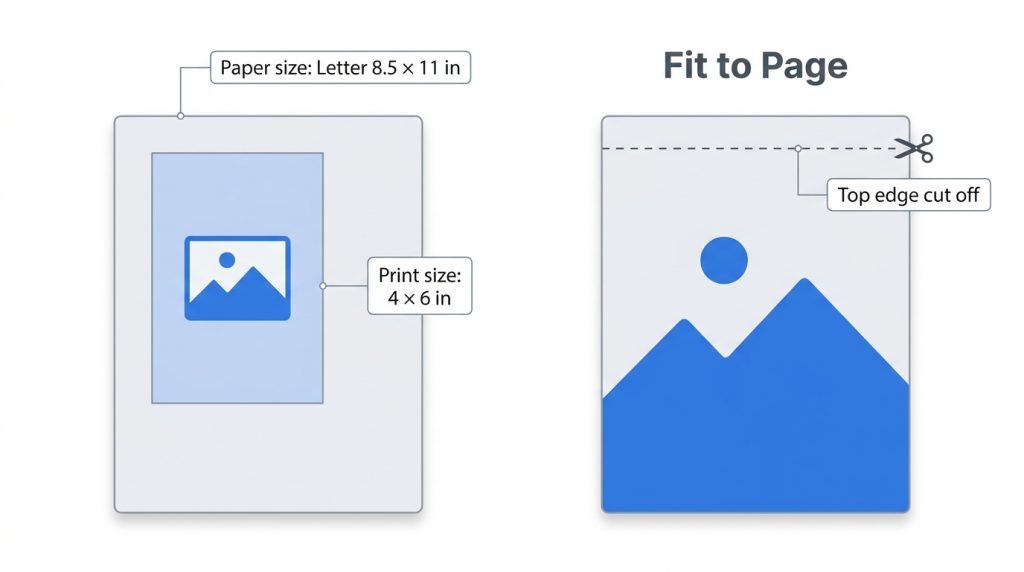
Take a 4×6 photo on Letter paper. At a 4×6 in print size, the photo covers a 4×6 patch and the rest of the sheet stays blank. If the phone “fits to page” instead, it stretches the photo to fill the sheet. A 4×6 photo is 2:3 in shape and Letter is closer to 3:4, so filling the width pushes about 14% of the photo’s height off the bottom. That’s the “why is my picture cropped?” problem in one example.

Printing several photos on one sheet instead? See our guide to printing multiple pictures on one page.

Diagram showing a 4 × 6 inch photo printed on a Letter sheet next to the same photo stretched by Fit to Page
Caption - Paper size is the sheet. Print size is how big the photo is on it.

Why the iPhone print screen can’t change photo size

Open a photo, tap Share, then Print, then tap the printer options. Apple’s AirPrint guide describes the choices: a printer, the number of copies and, depending on the app, options such as page range. Printer makers list the same short set (copies, page range, double-sided) and add that paper size appears only when the app and printer support it. Canon’s AirPrint guide notes that the paper size is picked automatically from the app you print from, and for photos the default in most countries is 4×6 inches.

What’s missing is any control over scale. AirPrint fits the content to the sheet, so if the image’s shape doesn’t match the paper’s shape, it gets enlarged, shrunk or trimmed. That’s the whole reason prints come out the wrong size. It’s a limit of the print dialog, not a bug in your phone.

Method 1: Change print size with Photo Printer (exact size)

Use this when the size matters: passport photos, frame inserts, wallet prints, anything you’d check with a ruler. Photo Printer sets the photo’s dimensions before printing, so the printer isn’t left to guess. It works on iPhone, iPad, Android and Mac.

Step 1: Download the app. Get it from the App Store or Google Play.

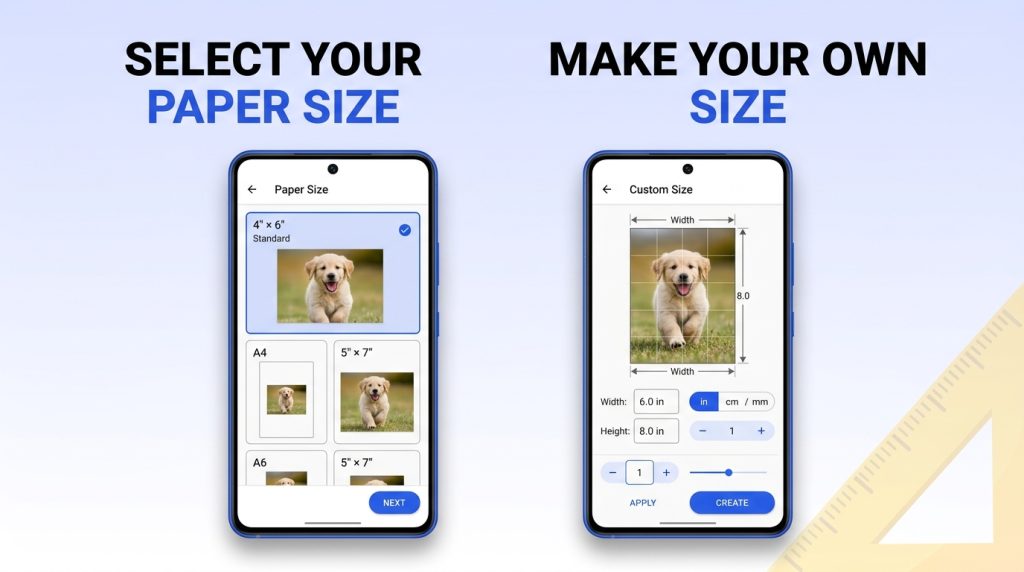
Step 2: Choose the paper size. Pick A4, US Letter, Legal, 4×6 or 10×15, whichever is physically in your tray. The layout redraws to match.

Step 3: Add your photo. Bring in one photo or several. You can add a caption or label on the sheet without opening another editor.

Step 4: Pick a preset or type your own size. Presets cover 2×2 in (51 mm), 35×45 mm, 2×3 in, wallet, 4×6 and 5×7. For anything else, enter a custom width and height in inches, centimeters or millimeters.

Photo Printer app screen: US Letter paper size selected and a custom 4 by 6 inch photo size
Caption - Photo Printer on Android: choose the paper size, then type the exact photo size.

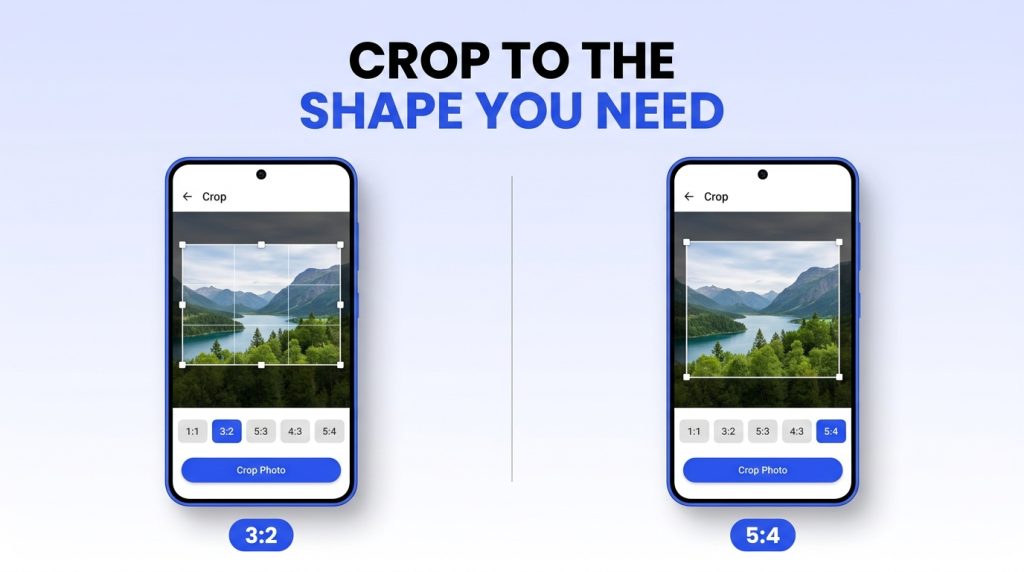
Step 5: Crop and rotate. Choose between fit and fill. Fit keeps the whole photo and may leave blank bars. Fill covers the frame and trims whatever hangs over. For a passport photo, line your face up with the on-screen guide and crop to the numbers instead of by eye.

Photo Printer app screen: Crop screen comparing the 3:2 and 5:4 crop ratios on the same photo
Caption - Photo Printer on Android: pick a crop ratio so the photo fits the print shape you need.

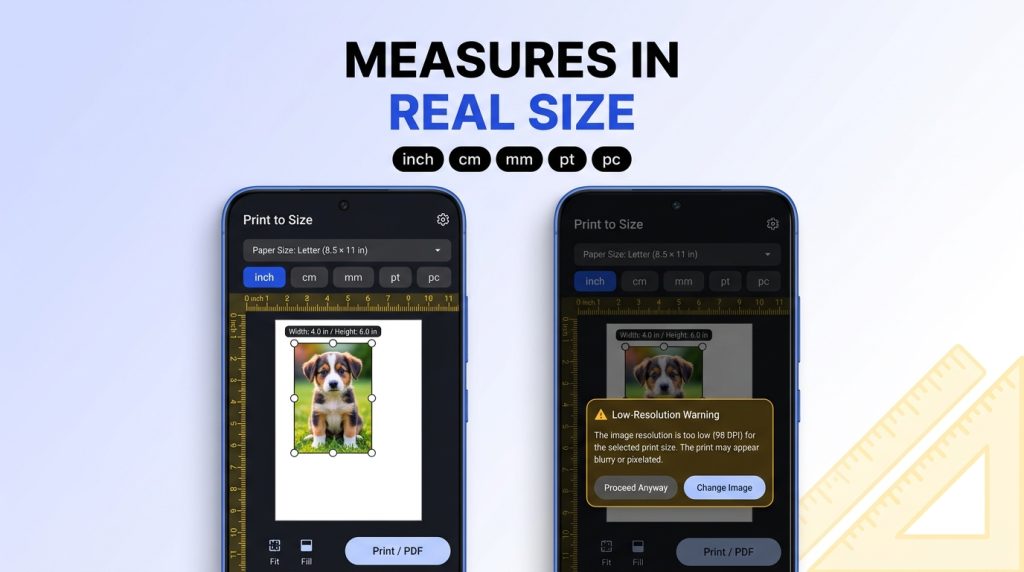
Step 6: Check the ruler and the quality warning. The ruler shows real dimensions in millimeters or centimeters. If the photo doesn’t have enough pixels for that size, the app warns you before you waste paper.

Photo Printer app screen: Print To Size with a built-in ruler and unit options inch, cm, mm, pt and pc
Caption - Photo Printer on Android: the built-in ruler shows the real size, and you can switch units.

Step 7: Print. Send it through AirPrint at 100% scale, or export a high-resolution file and print later.

The features that make exact size work

  • A real ruler: switch between centimeters and millimeters with one tap and see the true size on screen
  • Every paper size: search A4, Letter, Legal and 10×15 instead of scrolling
  • Make your own size: type any width and height for lockets, custom frames and crafts
  • Crop by the numbers: US 2×2 in and international 35×45 mm presets for ID photos
  • Save your drafts: reprint the same layout later without rebuilding it
  • DPI/PPI check: a warning appears when the resolution is too low for the size you chose

See them all in the features section, or check the app’s FAQ for how photos are handled (they’re processed on your device, not uploaded).

One limit to know: the app controls the size of the print. It can’t make a printer do something it doesn’t support, such as borderless printing on paper it can’t take. Your printer still has to accept the paper size you chose.

Printing a Passport Photo? Check This First

 Look up your country’s required size, pick the matching preset instead of cropping by eye, then print one test on plain paper and measure it before you use photo paper. 

Method 2: Change the paper size in the iPhone print screen

  1. Open the photo in Photos.
  2. Tap Share, then Print.
  3. Tap the printer options.
  4. Tap Paper Size and choose from the list.

Two catches. The option appears only if the printer reports more than one paper size to the iPhone. And it changes which sheet the printer expects, not the size of the photo on it. If you choose 4×6 and only Letter is loaded, the printer will usually stall or complain rather than substitute. Use this method when the sheet is the problem, not the photo.

Method 3: Use your printer brand’s app

Brand apps often expose more than the iPhone does, but each one only talks to its own printers.

App

What you can set

Notes

HP app (replaced HP Smart on iOS and Android)

Paper size and photo options; 4×6 is typically listed under Print Photos

HP says the HP app replaces HP Smart. If 4×6 is missing, HP’s community advice is to update iOS and printer firmware and set paper size on the printer’s own panel

Epson iPrint

Paper size and type, copies, page range, one- or two-sided

Epson printers only

Canon PRINT Inkjet/SELPHY

Photo Print screen with paper size, media type, bordered or borderless

Canon printers only. Pinch-to-zoom cropping isn’t on every model

These apps choose a paper size. None of them sets a photo to “51 × 51 mm” for you.

Method 4: Crop in Photos or place the photo in Pages

Crop in Photos. Open the photo, tap Edit, then Crop, and choose an aspect ratio such as 2:3 (the shape of a 4×6 print) or 5:7. This fixes the shape so the print isn’t trimmed unexpectedly. It doesn’t set a size, and it removes part of the image from the edited copy.

Place it in Pages. Pages is the closest built-in option to exact sizing.

  1. Tap More (the three dots), then Document Options, then Document Setup.
  2. Tap Custom Size and enter the width and height, or choose a standard paper size. Tap Done.
  3. Insert the photo, select it, and set its width and height in the Format options.
  4. Print from Pages.
 

Pros

Cons

Photos crop

Fast, built in

Sets shape, not size; removes part of the picture

Pages

Exact dimensions, free

Fiddly on a phone; no real-size ruler preview

Common photo print sizes

Print preset

Inches

Millimeters

Typical use

US passport / visa

2.0 × 2.0

51 × 51

US and India passport and visa forms

International passport

1.38 × 1.77

35 × 45

UK, Schengen and many other countries

Classic wallet

2.5 × 3.5

64 × 89

Wallets, school keepsakes, lockets

Mini keepsake

2.0 × 3.0

51 × 76

Scrapbooks, journaling, gift cards

Standard frame

4.0 × 6.0

102 × 152

Tabletop frames, albums

Medium desk frame

5.0 × 7.0

127 × 178

Wall frames, portraits

Always check the issuing authority’s current rules. Canada, for example, requires 50 × 70 mm passport photos (2 × 2¾ in), not 35 × 45 mm, per Canada.ca, and has its own rules for who must take printed photos. Want six passport photos on one sheet? Our multiple pictures guide covers the 4×6 layout.

Printing smaller than the sheet. Set the photo to the size you need, smaller than the paper, and leave the rest blank. A 2×3 print on Letter is fine. Cut it out afterward.

Fit to Page vs Actual Size. Fit to Page rescales the file to the sheet, so the size changes. Actual Size (100%) prints each inch of the file as an inch of paper.

The resolution tip. Aim for 200 to 300 pixels per inch (PPI) at the print size. Pixels needed = inches × PPI. At 300 PPI, a 4×6 needs 1200 × 1800 pixels, a 5×7 needs 1500 × 2100 and a 2×2 needs 600 × 600. A 12-megapixel iPhone photo (4032 × 3024) holds enough pixels for about 13 × 10 inches at 300 PPI. Cropping tightly throws pixels away, so a small crop of a big photo can still print soft.

Make Your iPhone Print the Size You Choose 

Pick the paper, enter the exact size, preview it at real size, then send it to your printer. No more Fit to Page surprises.

How to print at the exact size: the checklist

  1. Match the paper size in the app and in the print dialog.
  2. Set scale to 100% or Actual Size.
  3. Check the preview before you print.
  4. For anything important (a passport photo, a custom frame), print one test on plain paper and measure it with a ruler.
A printed 4 by 6 inch photo laid beside a ruler showing the exact printed size
Caption - Print one test on plain paper and measure it. At 100% scale, the print matches the size you set.

What you see

Likely cause

Fix

Photo too big

Fit to Page enlarged it

Set 100% / Actual Size

Photo too small

Scaled down to fit margins

Set the exact size, then print at 100%

White borders

Paper size and photo shape don’t match

Match paper size; use borderless if supported

Cropped edges

Fill mode or mismatched aspect ratio

Use fit, or crop deliberately first

Right size, wrong paper

Dialog paper size differs from the tray

Match tray, app and dialog

Print multiple pictures on one page

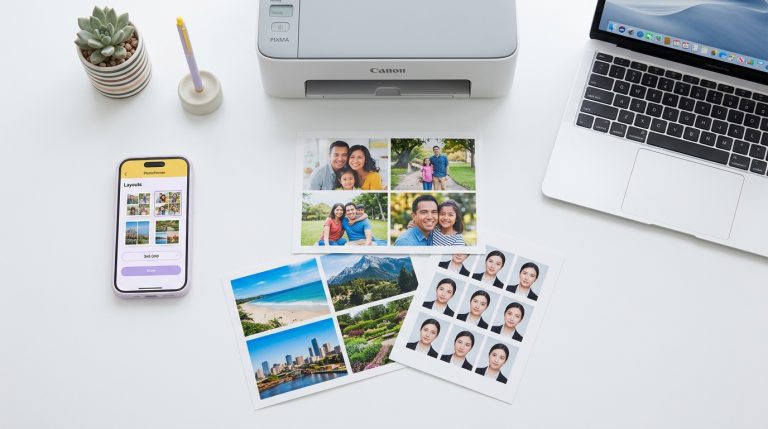
Need six wallet photos on one 4×6 or A4 sheet? Use a multi-up layout so each photo keeps its size and margins stay even. The step-by-step guide to printing multiple pictures on one page has exact sizes for 2, 4, 6 and 9 photos.

Troubleshooting

The paper size option is missing or won’t change. The iPhone only shows it when the printer reports more than one size, and options vary by app. Set the loaded paper size on the printer’s control panel, update iOS and the printer’s firmware, then try again. HP’s own advice for a missing 4×6 is the same sequence.

The iPhone won’t print to a wireless printer. Per Apple’s AirPrint support page, confirm the printer supports AirPrint and that both devices are on the same Wi-Fi network. Update iOS, check for printer firmware updates, and give the printer a few minutes after it powers on.

A print job is stuck. Open the App Switcher, tap Print Center, then tap Cancel Printing.

The printed size doesn’t match the preview. Check that scale is 100% / Actual Size in the app and any printer settings. Borderless printing can also enlarge the image slightly past the sheet edge to avoid white borders, so keep faces and text a few millimeters from the edge.

Tips for best print quality

  • Resolution: 300 PPI for prints you’ll hold close; 200 PPI is often fine for larger prints viewed from a distance.
  • Paper type: set it to match what’s loaded. Photo paper and plain paper need different ink handling.
  • Borderless and margins: if your printer can’t print borderless, leave margins and trim after.
  • Test first: one plain-paper test beats a wasted sheet of photo paper.

Photo Printer vs other ways to change print size


iPhone Print screen

Brand apps

Photos crop

Pages

Photo Printer

Sets exact photo size

No

No

No (ratio only)

Yes, manually

Yes (presets + custom)

Inches, cm and mm

No

No

No

Depends on settings

Yes

Real-size preview

No

Varies

No

Page preview

Yes, with ruler

Low-resolution warning

No

Varies

No

No

Yes

Works with any AirPrint printer

Yes

Own brand only

Yes

Yes

Yes

Best for

Quick prints where size doesn’t matter

Brand-specific features

Fixing shape

One-off layouts

Passport, wallet and frame sizes

What to look for in a print-size app: exact units (inches, cm, mm), a real-size preview, a low-resolution warning, true 100% printing and clear pricing.

Final thoughts

The iPhone decides paper size, but nothing built in decides photo size. Set the size first, check the preview and print at 100%, and prints will match what you measured. Ready to try it? Download Photo Printer, pick your paper size and print once.

Frequently Asked Questions

How do I change print size on my iPhone?

The iPhone's Print screen can't set a photo's size. Use an app such as Photo Printer to set exact dimensions, then print at 100% (Actual Size). Or set a custom page and photo size in Pages.

How do I change the paper size when printing from iPhone?

Open the photo, tap Share, then Print, tap the printer options and choose Paper Size. It only appears when the printer reports more than one size. Otherwise set it on the printer's panel or in the brand's app.

What's the difference between print size and paper size?

Paper size is the sheet you load. Print size is how large the photo appears on it. A 4×6 photo on Letter paper has a Letter paper size and a 4×6 print size.

How do I print a smaller picture from my iPhone?

Set the photo to the smaller size you want, such as 2×3 in, and print at 100% on a larger sheet. Fit to Page would enlarge it instead.

How do I print a photo in inches from iPhone?

Use an app with unit settings, such as Photo Printer, and enter the width and height in inches. In Pages, set a custom page size and place the photo at exact dimensions.

How do I print 4×6 or 5×7 from iPhone?

Load matching photo paper, choose 4×6 or 5×7 as the paper size, set the photo size to match and print at 100%. The Photos app often defaults to 4×6 in the US.

Why won't my printer let me change the paper size?

The printer may not be reporting multiple sizes to the iPhone, or the app you're printing from limits them. Set the paper size on the printer panel, update iOS and firmware, or try the printer brand's app.

Where are the printer settings on iPhone?

Share, then Print, then the printer options. The settings available depend on the app and the printer.

How do I see or cancel a print job on iPhone?

Open the App Switcher, tap Print Center to view the job, then tap Cancel Printing to stop it.
Share this guide
X
Facebook
LinkedIn
WhatsApp
Reddit

Related guides

Printing photos is now simple.

Set the size, check the ruler, print once. Your frame finally has something in it.

Scan to
Download the App
Start your next project with confidence
Free to start · iOS, Android & Mac · Pro from $5/mo
Scan to
Download the App
Start your next project with confidence